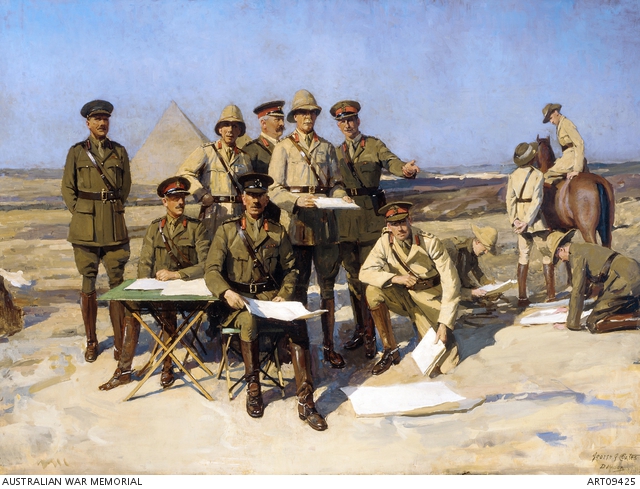
 General William Bridges and his staff watching the manoeuvres of the 1st Australian Division in the desert in Egypt, March 1915. (AWM ART09425)
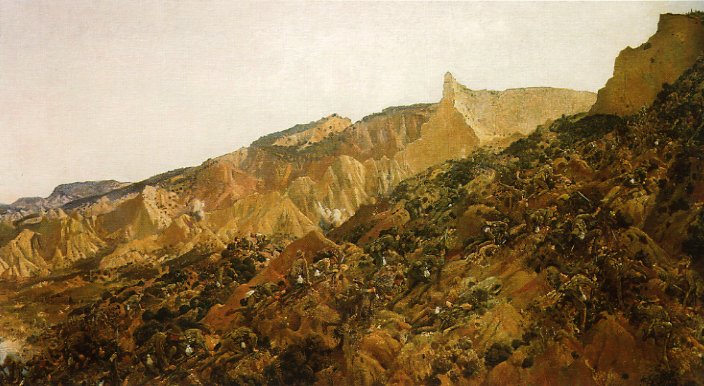 ‘Anzac, the landing 1915’ by George Lambert, 1922 shows the landing at Anzac Cove, 25 April 1915. The painting depicts the Australian soldiers of the covering force (3rd Infantry Brigade) climbing the seaward slope of Plugge’s Plateau which overlooks the northern end of Anzac Cove. The view is to the north, towards the main range. The yellow pinnacle is “The Sphinx” and beyond is Walker’s Ridge which leads to Russell’s Top.
At nightfall on April 25, ANZAC Divisions clung hard onto ridges above the landing beach. Hopes of a grand adventure, marching through the streets of Constantinople, evaporated by the hour. Maj. Gen. Bridges had to make a decision. Stay and fight or evacuate…
April 25th, 1915: A.M.
Having missed the landing point, the Aussies waded ashore.
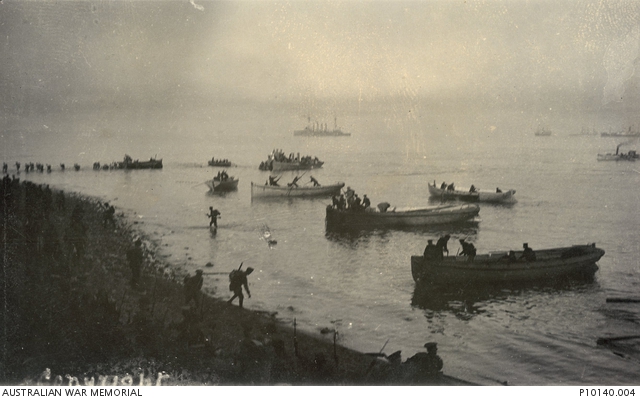
Anzac Cove. Troops of the 2nd Brigade landing on the morning of 25 April 1915. (AWM P10140.004)
In the early morning light The Sphinx cast her shadow. A maze of ravines, dense scrub and vertical cliffs rose upwards. Groups of ANZACs fought their way up, under withering fire. The Turks made a fighting retreat. These men from across the seas would pay a heavy price for each yard of their homeland gained.
From the beachhead to the heights, chaos reigned. Officers those still alive or able drove men on. Shrapnel burst overhead. Men crumpled into the dust. casualties mounted.
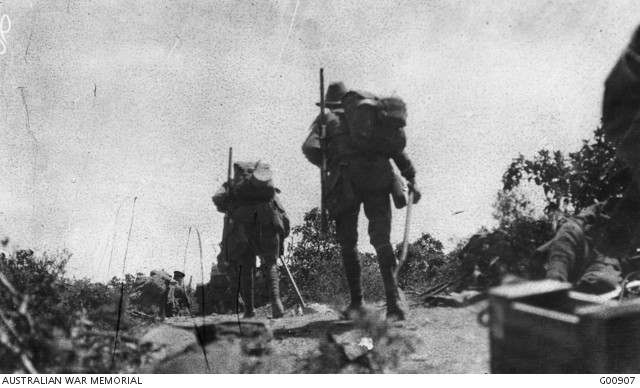
25 April 1915, about midday. Australian troops going into action across Plugge’s Plateau, under fire from the other side of Shrapnel Valley. This scene is from a captured Turkish trench overlooking Anzac Cove. (AWM G00907)
Despite the unexpected resistance, taking the strategic heights still seemed a possibility. But time was running out. Turk trenches and artillery positions still had to be overrun, and reinforcements were rushing to the battlefield. To drive the invaders back, into the sea.
Johnny Turk proved to be a tougher adversary than predicted, and a good shot. ANZAC officers were picked off. Without direction, in impossible terrain, the advance slowed. The initiative passed to the Turks.

25 April 1915, about 3pm. The position covering Quinn’s Post and the Chessboard occupied by the 7th Battalion Machine Gun section. (AWM J05582)
Turkish Officers were able to direct the battle unhindered. Mustafa Kemal seized the moment. He threw all his available troops into recapturing the heights around Gaba Tepe, reportedly telling the Turkish 57th Regiment:
Men, I am not ordering you to attack. I am ordering you to die. In the time that it takes us to die, other forces and commanders can come and take our place.
Their sacrifice is still remembered today. Out of ammunition and fleeing uphill, they were ordered to fix bayonets and lie down. The ANZAC’s hesitated, and halted short of their main objective, changing the course of the battle.
Their objective that day? Hill 971 dominating the landing area. Baby 700, below Hill 971 changed hands in desperate fighting. Unable to maintain a foothold, the ANZACS retreated to back to Battleship Hill, below Baby 700.
A spur of Hill 971, the 3rd Ridge was an important objective of the first day. It was also known as Gun Ridge because of Turkish gun emplacements. This ridge was reached despite heavy losses but without support it could not be taken. The Turkish Artillery continued to reign shells and shrapnel onto any ANZACs in visual range, causing terrible casualties.
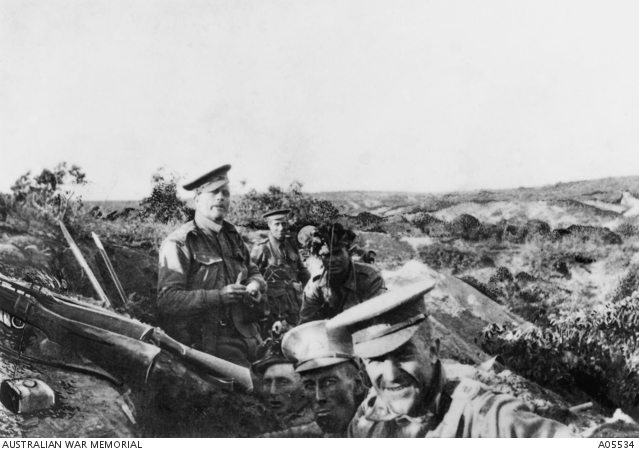
25 April 1915. Members of 13th Battalion occupying Quinn’s Post on the heights above Anzac Cove. (AWM A05534)
By the end of the day both sides had reached a stalemate. Traumatized and dehydrated the combatants dug in as best they could, and waited.
The setting sun cast long shadows, shrouding the dead in darkening gullies. Tormented cries of the wounded carried on the wind. An expected counter-attack at any moment meant there would be no rest for the exhausted survivors that night.
.
April 25th, 1915: P.M.
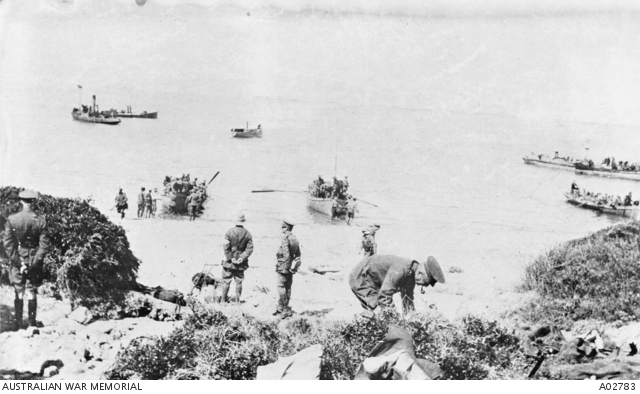
25 April 1915. Troops landing at Anzac Beach. On the far left with his back to the camera, is General Bridges, looking out to sea. (AWM A02783)
Cut into a gully on the beach, with reinforced sandbags and a canvas roof, stood the makeshift HQ of Major General Bridges. It was here that the next moves of the campaign were being thought out, and the fate of the soldiers in the hills decided upon.
Now, writes C.E.W. Bean, at the end of the day –
[Bridges] was striving with all his great mental power and determination to ignore his personal feelings and to keep before his eyes only one issue – what course was best in the interests of the enterprise.
Bridges was as certain as everyone else that a heavy counter attack would come with the daylight.
All his inclination was to stay and fight.
Evacuation was a thought neither Bridges, nor his staff wanted to entertain.
He found it exceedingly difficult to decide. But in view of what he heard on all sides, it seemed to him, as to White, that the soldierly course was to face a withdrawal and the preparations should be made for evacuation. Godley was in consultation with him, and was convinced of the likelihood of a disaster in the morning.
General Birdwood would need this information to consider and decide upon. They signaled to Birdwood aboard the Queen Elizabeth – ‘come ashore.’
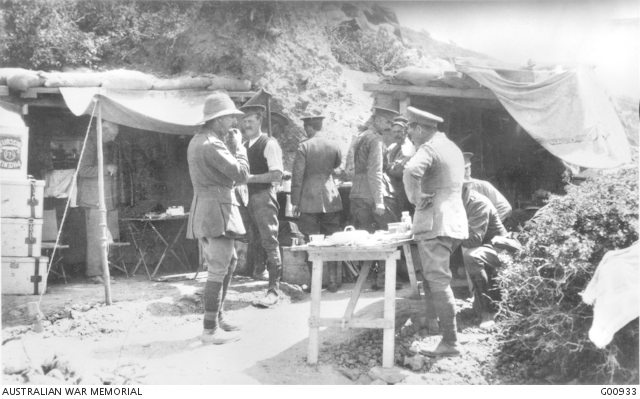
3 May 1915. At General Bridges’ first Headquarters at Anzac, during lunch. The officers in the photograph, reading from left to right, are General Bridges, (in dugout); Lieutenant Riches; Private Wicks (Batman to General Bridges); Captain Foster (Aide-de-Camp); Major Gellibrand; Colonel Howse; Major Blamey; Colonel White; Major Wagstaff. The position was exposed to shrapnel fire and Major Gellibrand was wounded there. (AWM G00933)
Bridges to Birdwood: In the interests of the enterprise..
The entrance to the gully off Anzac Beach where headquarters was located for the greater part of the Gallipoli campaign.
After 10pm, high-ranking officers gathered inside Bridges’ beach HQ. Candle and torchlight illuminated the interior, casting shadows. The tents opening flapped in the warm Mediterranean evening breeze.
Inside, Bridges stooped like a hawk, examining a report. He and his staff looked up from their campaign maps and paperwork. General Birdwood entered, followed by a series of salutes and cordial introductions.
Bridges, never one to mince his words, spoke to the point. ‘Birdy’s’ facial muscles tensed as he listened to the urgent matters at hand. He had already seen the chaos of the landing area with lines of wounded and dying laid out on the beach. – and now, this news, going from bad to worse.
… the two divisional commanders laid before Birdwood their grave doubts as to whether the over-stained troops could possibly withstand further shellfire and a heavy attack in the morning …
Birdwood respected Bridges’ opinion. But he could not countenance talk of defeat,
The idea of evacuation came as a shock to Birdwood. At first he was completely opposed to it. But it was late and an instant decision one way or the other was required. Bridges, whose advice counted greatly with him, led him aside, and urged the immense importance of the matter.
If anything was to be done it must be done before dawn. In the end Birdwood was impressed, exactly as Bridges had been, by the intense anxiety of his subordinates. He did not, however take action on his own initiative, as Bridges had urged, or even make a definite recommendation.
Sir Ian Hamilton, commander of the campaign would need to know the full situation at Gaba Tepe. Birdwood was aware that the British landings at Helles had run into difficulties,
He simply put the case most strongly before Hamilton, and left the responsibility of decision to him.
Birdwood to Hamilton: If we are to re-embark…
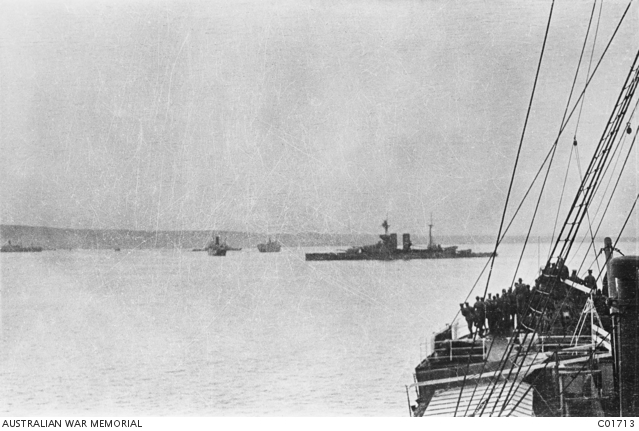
The battleship HMS Queen Elizabeth and other vessels off Anzac Cove on the morning of the landing. The Queen Elizabeth provided covering fire for the advancing troops.
Birdwood sent the following hand-written message to Sir Ian Hamilton aboard the Queen Elizabeth.
Both my divisional generals and brigadiers have represented to me that they fear their men are thoroughly demoralised by shrapnel fire to which they have been subjected all day after exhaustion and gallant work in the morning. Numbers have dribbled back from the firing line and cannot be collected in this difficult country. Even New Zealand Brigade which has only recently been engaged lost heavily and is to some extent demoralised. If troops are subjected to shellfire again to-morrow morning there is likely to be a fiasco, as I have no fresh troops with which to replace those in the firing line. I know my representation is most serious, but if we are to re-embark it must be at once.
Hamilton aboard the Queen Elizabeth woken from his sleep at about midnight,
[I]n his pyjamas [he] came into the Admiral’s cabin where de Roebuk, Thursby, Commodore Keyes, Carruthers and Cunliffe Owen were standing round the table.
Thursby handed him Birdwood’s letter. In silence he read it, and then looked up. “This is a difficult business,” he said. “What are we to do about it?”
Braithwaite stood there in his pyjamas, chewing on his big moustache, but making no remark or suggestion.
It was Thursby who answered. He said he did not believe it was possible to evacuate the troops. The boats, many of them had been smashed and sunk, the transports had been scattered… Hamilton asked Curruthers what he thought… [he] replied that it seemed to him impossible to re-embark the force within necessary time. Cunliffe Owen agreed. “Well, on that I decide it,” said Hamilton.
Hamilton to Birdwood: Dig, dig, dig…
Hamilton sat down and wrote to Birdwood.
Your news is indeed serious. But there is nothing for it but to dig yourselves right in and stick it out. It would take at least two days to re-embark you, as Admiral Thursby will explain to you. Meanwhile the Australian submarine AE2 has got up through the narrows and has torpedoed a gunboat at Chunuk. Hunter-Weston, despite his heavy losses, will be advancing tomorrow, which should divert pressure from you. Make a personal appeal to your men and Godley’s to make a supreme effort to hold their ground.
Ian Hamilton
P.S You have got through the difficult business, now you have only to dig, dig, dig until you are safe.
Ian H
And that is exactly what they did, like their lives depended on it. In the words of C.E.W Bean —
The forms of men hard at work could be seen in the moonlight … the clink of shovels was everywhere on the hillside.

Out to sea warships sat silhouetted against the evening horizon. Iron leviathans floating at the edge of the world, exhaling smoke and steam from their coal-stoked bellies. At ANZAC Cove, the moon shone over the wine glass Mediterranean. Boats brought men and equipment in, and ferried the injured and dead out.
Greek and Trojan warriors who fell in battle made their journey, so they believed, across the river Styx to the underworld. To do this they had to pay the ferryman. If coins weren’t placed in the mouth, the deceased man’s soul wandered the shoreline for 100 years. A century has past since the ANZACs stormed the Sphinx’s heights. They paid a heavy price, but their spirits still wander over the shores of our literary imagination. Like the ancients they are remembered by modern bards like C.E.W. Bean, whose official histories are mentioned below:
Bibliography
Broadbent, Harvey Gallipoli: the fatal shore Penguin : Camberwell, Vic. 2005
Hart, Peter Gallipoli London : Profile, 2011.
Moorehead, Alan Gallipoli Arum: London, 1956, rep 2007.
Roberts, Chris The landing at ANZAC 1915 Big Sky Publishing: Newport, NSW 2015.
Recommended sites
Gallipoli: The first day ABC online http://www.abc.net.au/gallipoli/
Morris, Phillipa From Mosman to Gallipoli http://mosman1914-1918.net/project/blog/mosman-to-gallipoli
Follow Maj. Gen. Bridges story…
The death of a gallant and erudite soldier
Burning Bridges: ANZAC in hindsight, 100 years on
Articles about the August offensives at Gallipoli.
Hill 60 and the lost 18th. Aug. 22, 1915
Hill 60 and the lost 18th. Aug. 27, 1915