Charles E.W. Bean’s descriptions of events are invaluable as a primary source. He had a high opinion of the Australian soldier and a great respect for General Bridges. Historians have taken a less partisan view of Bridges’ performance on the 25th.
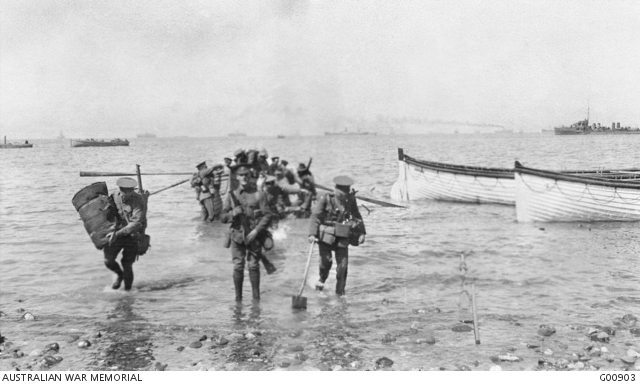 Gallipoli Peninsula, Turkey. 25 April 1915. The Divisional Headquarters Staff wading ashore at Anzac Cove. The officer with the spade is thought to be Major Cecil Henry Foott DAQMG (Later Brigadier CH Foott CB CMG).
General Bridges came ashore after 7am. He found no commanders to brief him and units mixed up. Groups of exhausted, confused and wounded men were filling the beach.
Bean recorded the situation once Bridges’ makeshift HQ had been set up:
Again and again, every hour, agonized messages came from brigadiers, from battalion commanders, even from company commanders for reinforcements. Hour after hour he had to judge which need was most urgent. To many an appeal he would only grunt; “Umph!..tell them they’ve got to stick it out!” He managed to keep his last reserve – the 4th battalion – just long enough to save the situation on his southern flank.
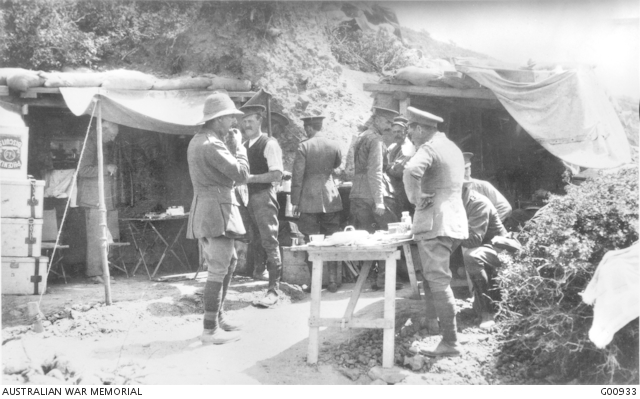
3 May 1915. General Bridges’ Headquarters at Anzac. (AWM G00933)
Historians have been critical of Bridges for not sending reserves to Hill 971, and for not over-ruling 3rd Brigade commander, and trusted Colonel, Sinclair-MacLagan
Maclagan ‘s fears of an attack to his exposed right were evident before the battle. Whilst observing the landing site from their command ship, Bean notes
Colonel Maclagan, who commanded the 3rd Australian Infantry Brigade, which was to make the first landing and then deal with Gaba Tepe, kept his glasses upon that low, grim promontory on his prospective right flank. The barbed-wire entanglement on the beach was plainly visible. “If that place is strongly held with guns,” he thought, “it will be almost impregnable for my fellows.” MacLagan was deeply impressed with the difficulties. Bridges thought him pessimistic. Birdwood rallied him. To other officers, who were making notes of what they saw, the difficulties did not appear so great. “The beach selected seems excellent,” wrote one. “Coast seems suitable for landing,” noted another.
As Bean mentions, Bridges was aware of the value of Baby 700 and Battleship Hill to the campaign. But he allowed MacLagan to use 2nd Brigade (meant for Hill 971) to strengthen his position on 2nd ridge. This diversion of troops was contrary to original orders.
MacLagan’s fears of a Turkish counter-attack proved incorrect. Some have said that MacLagan stabilised a chaotic situation and saved the landing. Establishing a defensive position on 2nd ridge meant 3rd (Gun) Ridge and 971 were never taken.
ANZAC forces would spend the rest of the campaign hemmed in on a broken defensive line, facing uphill . After the 25th, the Turks used their reserve forces to tighten their stranglehold.
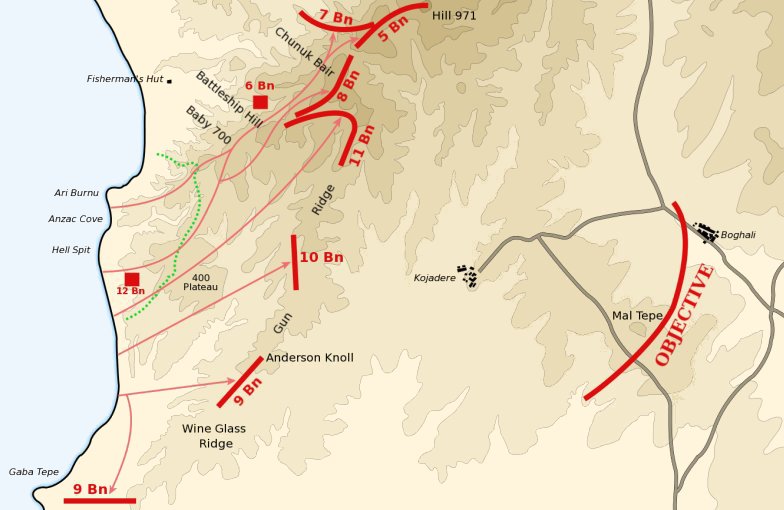
Initial objectives for the landing shown in red; the dotted green line is what was actually achieved. Derived from Map No. 7 in Ch.11, Vol. I “The Story of Anzac” of the Official History of Australia in the War of 1914-18 by C.E.W. Bean. (Source: Wikipedia)
Bridges (and Birdwood) have also received criticism for delays in bringing heavy ordinance ashore. Only 12 of the 60 Allied guns available were landed on the1st day at ANZAC Cove. Turkish artillery rained shrapnel among advancing troops with relative impunity, causing heavy casualties. Allied naval guns proved to be ineffective knocking them out due to poor visability, and aiming tradjectory.
Although the artillery was a decisive factor, this criticism of Bridges is harsh. Bridges feared losing his artillery pieces during any counter-attack it is true. But the failure to get guns ashore was largely due to the logistical difficulties of amphibious landing. The steep terrain also prevented proper deployment.
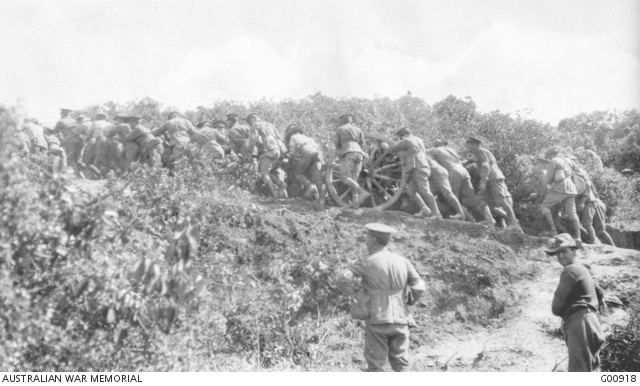
26 April 1915. Australian artillerymen dragging guns into position. By 6pm on the first evening one gun had been placed on the neck above the southern end of Ari Burnu beach, and next day more guns were dragged over this neck into positions to the right. (AWM G00918)
No major counter-attack would be forthcoming on the night of the 25th. Bridges and his staff didn’t know that the ANZACs and Turks had already ‘shot their bolt’. Neither side would get much further than they did on the first day. The story of the campaign would become one of deadlock, attrition and failed breakout.
In relation to the issue of evacuation on the evening of the 25th;
Maj. Generals Bridges and Godley were unaware of the results of other landings. At Helles the British had also failed to make headway. An evacuation from Anzac Cove would have shifted the ANZACS from one fatal shore to the next.
The final evacuation in December worked because it was well planned and executed. Enough embarkation craft were not available on the 25th, according to Thursby. Deserting would have been demoralising but casualties could also have been high.
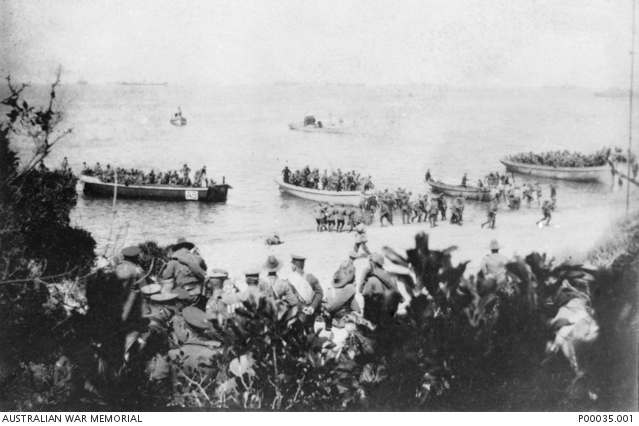
25 April 1915. Landing of the 1st Brigade signals section.(AWM P00035.001)
The ANZAC landing had 2 intended outcomes. Stop Turkish units from reaching the British landing at Helles in the south. Then, take out Turkish guns preventing the navy from progressing through to Constantinople.
The troops and officers were enthusiastic. The British had access to accurate maps. So why did the landings fail?
A few reasons. The Turks and their German advisors had time to organize their defenses. The naval bombardment of Turkish coastal defenses signaled allied intentions. The build up of men and logistics on nearby Greek Islands also meant invasion was imminent. The allies came unprepared and under equipped. They lacked enough supplies, reinforcement and artillery support.
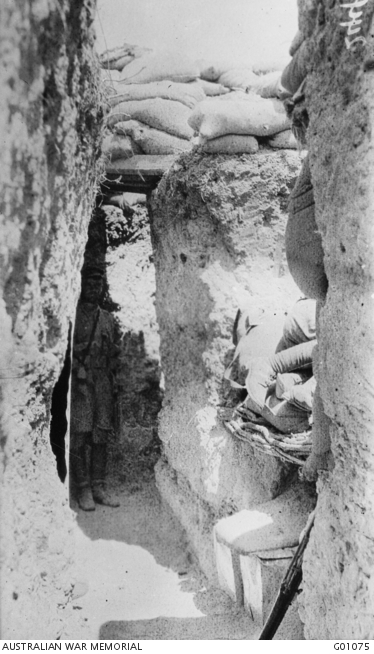
A trench in the old firing line near Steele’s Post. The firing position is shown on the right, and the sleeping quarters on the left. Overhead traverses were also provided in these trenches against enfilade left. (AWM G01075)
Sir Ian Hamilton’s planning was daring but unrealistic. The presumption that the Turks would cut and run was false. (Disproved during the navy’s costly attempts to ‘force the narrows’)
The British assumption they could ‘muddle through’ proved nothing more than wishful thinking.
Many other factors played their part and forced the hand of senior staff on the night of the 25th of April. Daunting terrain, lack of experience, poor communications. Bad decision making and the resolve of the Turks to defend their homeland. All contributed to the end result.
Most analysts say the campaign, doomed from the start was pointless side show. Europe was where WW1 would be won.
If that is the case, could anyone else have done a better job? – at ‘muddling through’ the 1st day – if they were in General Bridges position?
Follow Maj. Gen. Bridges story…
An audience with the Sphinx: Maj. Gen. Bridges at ANZAC, 25th April, 1915
The death of a gallant and erudite soldier
Articles about the August offensives at Gallipoli.
Hill 60 and the lost 18th. Aug. 22, 1915
Hill 60 and the lost 18th. Aug. 27, 1915